Windows
 Apple Silicon


Table of Contents
Filters are a core tool for enhancing visual quality and unifying the style of your footage. They quickly adjust the color tone (e.g., cool tones for a premium feel, warm tones for coziness), intensify the scene atmosphere (e.g., cinematic filters for narrative depth, wedding filters for romance), and correct flaws (e.g., brightening shadows, reducing overexposure), transforming ordinary clips into professional-grade visuals. As professional editing software, Adobe Premiere Pro (Pr) supports multiple methods for adding filters, catering to both basic color grading and advanced, personalized stylization. This article systematically explains how to use Pr’s built-in filters and how a Pr filter plugin can efficiently unlock a vast library of beautiful Pr Lumetri Color presets, saving time and elevating results.
1.How to Add Lumetri Color in Pr
Pr includes a rich set of basic Lumetri Color (also called “Effects”), allowing beginners to perform quick color correction and stylization without additional plugins:
- Preparation: Open Pr, create a new project, import your video Media, drag it to the Timeline, and select the clip you want to edit.
- Find Pr Filters: In the Pr interface, go to the top menu bar: Window > Workspace > Effects. In the opened Effects Panel, expand the “Lumetri Presets” folder. You’ll see categories like “Filmstocks,” “Movies,” and “Speedlooks.” Under “Speedlooks,” subcategories like “Universal” and “Monochrome” contain presets such as “Black & White Normal Contrast” for a quick minimalist look, while presets under “Movies” add instant cinematic film grain atmosphere.
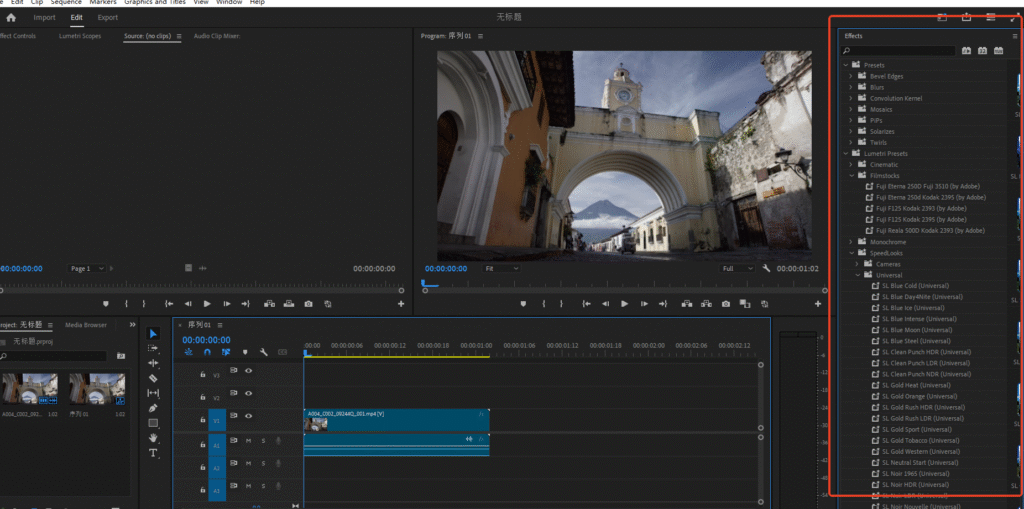
- Apply the Effect: Select your target filter (e.g., “Temperature” under “Color Correction”) and drag it directly onto the video clip on the Timeline. The effect will apply to the entire segment.
- Fine-tune Parameters: Select the clip with the applied effect. In the “Effect Controls” Panel, locate the corresponding filter and adjust its parameters (e.g., increasing the Temperature value warms the image; decreasing it cools it down). To apply a filter locally, use the Pr Pen Tool to create a mask, limiting the effect’s range.
Note: Pr’s built-in Lumetri presets focus on basic styles and lack coverage of many popular, high-quality cinematic or trendy looks. Switching presets requires manually removing the current one before adding a new, which is cumbersome. Achieving complex effects (e.g., dedicated wedding soft-focus tones or broadcast-level polish) often requires manually adjusting parameters or combining multiple presets on top of the existing ones, posing a higher barrier for beginners and consuming significant time.
2.Recommended Pr Filter Plugin
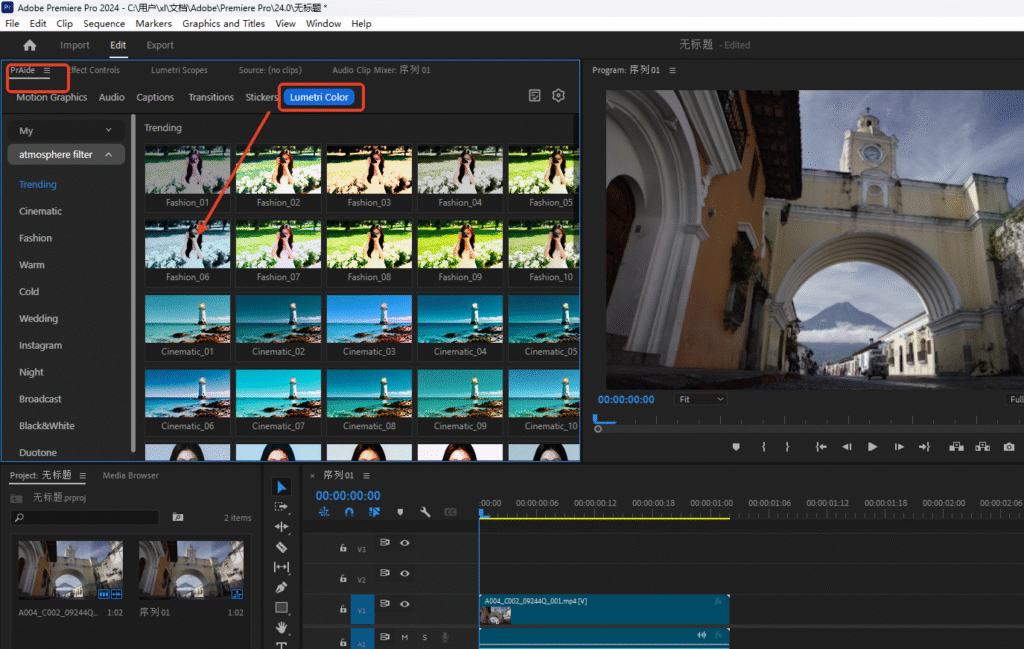
To quickly access rich, high-quality Pr filter effects while boosting editing efficiency, we recommend the PrAide plugin. This smart tool seamlessly integrates AI features and a premium asset library into Pr, offering a much wider range of Pr Lumetri Color preset templates. It unlocks a massive collection of stylized filters with one click, solving the limitation of Pr’s native filters.
1. Core Advantages of PrAide Filter Templates
- Vast Library of Exquisite Pr Filter Templates, Covering All Styles: Select the “Lumetri Color” category in the main PrAide interface to access a dedicated library of Pr filter templates. All templates are optimized and include cinematic, cool-tone, warm-tone, duotone, fashion, wedding, stylized, black & white, night, broadcast, and many other styles. Whether for short videos, Vlogs, ads, wedding highlights, or documentaries, you can find the perfect filter without manually combining basic effects.
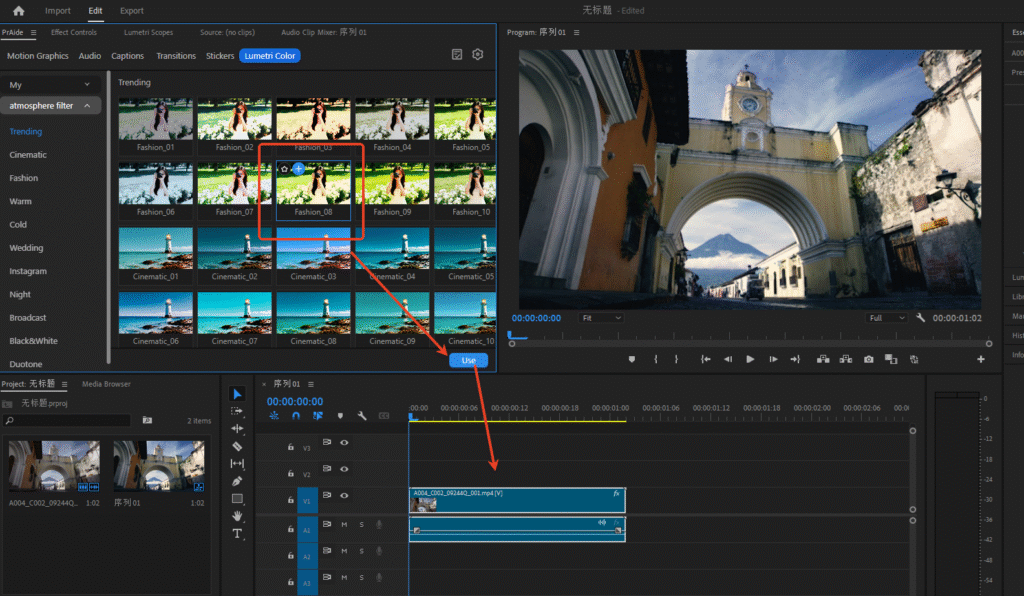
- One-Click Application & Free Switching, Zero Learning Curve: No need to master complex color grading parameters. Simply select one or multiple clips on the Pr Timeline, double-click a PrAide filter template, and apply it in 1 second (the plugin automatically configures the corresponding parameters in Effect Controls). If unsatisfied, switch directly to another template without manually deleting the previous filter, offering maximum flexibility and efficiency compared to Pr’s native “hard-to-modify, cumbersome-to-change” workflow.
- Supports Batch Application for Efficient Editing: PrAide’s filter templates support one-click application to multiple clips. Just select several segments on the Timeline and double-click the target filter template to apply the same effect to all selected clips at once. This drastically saves time in batch editing, especially for multi-clip short videos or series production.
2. More Than Filters: One-Stop Pr Editing Workflow Service
PrAide is not just a filter tool but a comprehensive plugin covering the entire Pr editing process, allowing you to complete everything from Media optimization to final Export without switching tools:
(1) Rich Editing Assets
Beyond a massive filter library, PrAide provides a full suite of assets including Pr Motion Graphics templates, Stickers, Animated Stickers, Transitions, Transition Effects, Captions templates (Animated Captions, Static Captions), background music, and Sound Effects. Drag and drop to apply, combining them with filters for more designed visuals and richer Audio.
(2) AI-Powered Pr Editing Workflow:
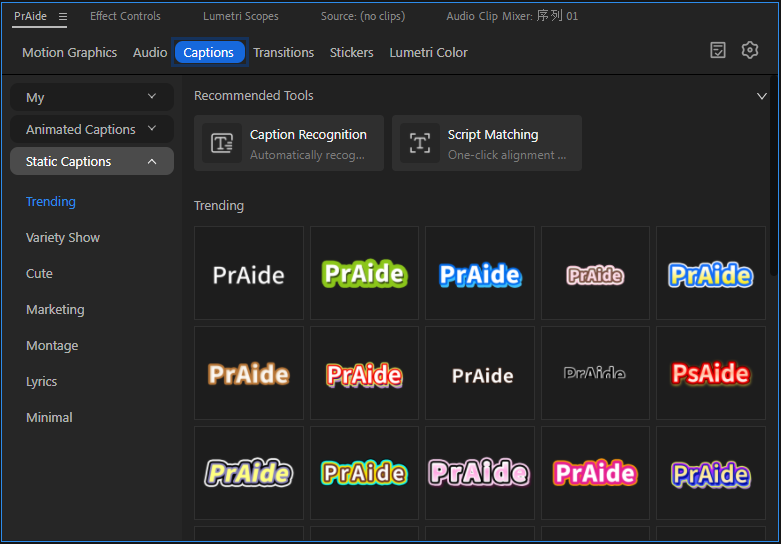
- Smart Captions Processing: Built-in AI Caption Recognition and Script Matching accurately transcribe video speech into Pr Captions with high precision, saving manual typing time. It offers various Pr Caption style and animation templates; apply with one click to animate your Captions, automatically syncing with the video’s rhythm.
- Personalized Voiceover Solutions: Supports multi-voice AI Voiceover with natural, expressive delivery. The AI Voice Cloning feature allows you to record a custom voice sample to generate personalized Voiceover, giving your video a distinctive sound and perfectly addressing both “Captions +Voiceover” needs.
- AI-Generated Premium Assets: Supports AI-generated video Media. Input your requirements, and AI can create creative video Stickers.
If you only need basic color correction (e.g., adjusting brightness, temperature), Pr’s built-in filters are sufficient. However, for quick access to professional-grade cinematic, wedding, duotone, and other stylish filters—alongside efficient batch operations and full editing asset support—PrAide is the optimal choice. Its effect-controlled filter templates, combined with AI-assisted full-workflow support, make adding Pr filters accessible even to beginners, enabling visuals that rival professional teams.
Whether you’re a beginner or an experienced creator, PrAide helps you escape the tedious process of creating Pr filters, freeing up more time for creative thinking. Give it a try and make your Pr projects more visually captivating!
PrAide Download:https://pr.aide.art/
Perhaps a simple attempt will bring unprecedented ease to your Pr editing. If you’re struggling with creating Pr filter effects, click to Install Now and try PrAide bravely—you might gain unexpected rewards