Windows
 Apple Silicon


Table of Contents
Recently, I’ve noticed many video editing newcomers asking about the basic usage of Pr Transitions. While transitions might seem simple, using them well can make video connections smoother. Beginners might not know which one to choose or how to adjust them.
Four Commonly Used Pr Transitions Today, I’ll teach you the most basic yet practical method for adding Pr Transitions. Starting from the Effects Panel – it’s easy for beginners to understand.
1.Import Media
First, open Pr, drag the two video clips you need to connect onto the Timeline, ensuring they are placed adjacent to each other. Then, locate the Effects Panel on the right side of the software interface (if you don’t see it, click “Window” in the top menu bar and check “Effects” to bring it up).
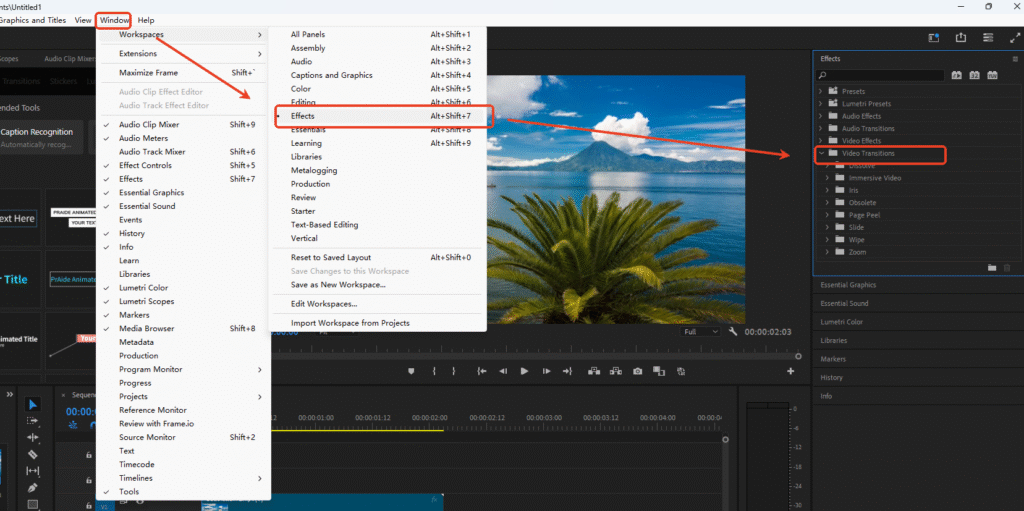
2. Find the Effects Panel
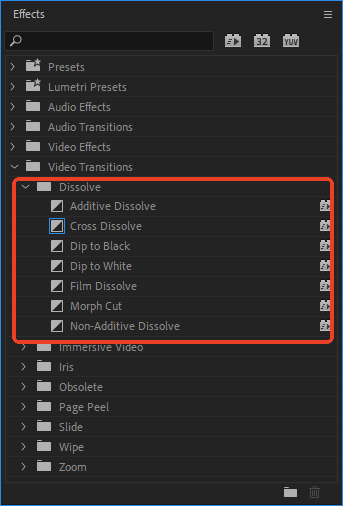
After opening the Effects Panel, find the “Video Transitions” folder and click to expand it. Inside, you’ll find dozens of Transition Effects. Beginners don’t need to memorize them all; mastering these four common ones is enough:
- Cross Dissolve (Smooth scene connection, suitable for most scenarios)
- Dip to White (Screen fades to white before switching, suitable for fresh, bright video styles)
- Dip to Black (Screen fades to black before switching, suitable for scene changes, emotional shifts)
If you’re making simple videos like daily vlogs or short clips, these few Transition Effects can fully meet your connection needs.
3. Add a Transition
Next, I’ll show you how to add Pr Transition Effects. The steps are super simple:
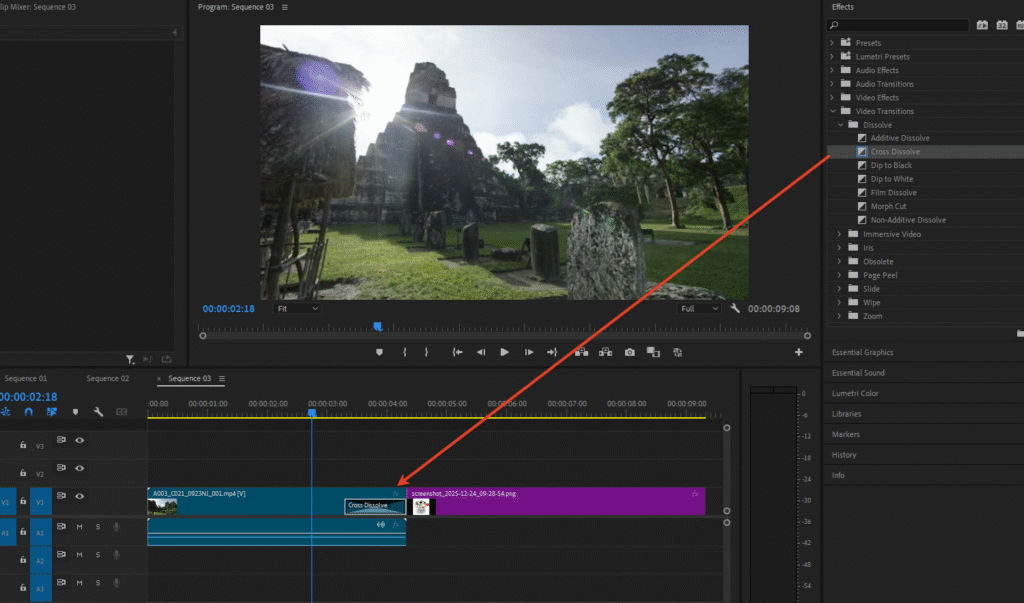
Step 1: In the “Video Transitions” folder, find the Transition you want to use (e.g., Cross Dissolve). Simply click and hold this effect with your mouse, drag it to the middle point between the two clips on the Timeline, and release the mouse button to complete the addition!
After adding it, a Transition effect box will appear between the clips. Play the video to see the two scenes connect via the Transition.
If you want to adjust the Transition duration, there are two simple methods:
- Quick Adjustment: Hover your mouse over the edge of the Transition effect box. The cursor will change to a double-sided arrow resembling brackets. Hold down the left mouse button and drag left or right to lengthen or shorten the Transition duration.
- Precise Adjustment: Click the Transition effect box between the clips. The “Effect Controls” Panel will appear at the top of the software (you can also right-click the Transition and select “Set Transition Duration”). In this Panel, you can directly enter a value for “Duration” (e.g., change the default 1 second to 0.5 seconds) or drag the slider next to the value left/right for precise control.
4. Adjust the Transition
Additionally, you can adjust the Transition position: Click to select the Transition effect box, then drag it left or right to change its starting point between the two clips (e.g., making the Transition closer to the end of the first clip or the beginning of the second).
To summarize: The core of adding a Transition is “Find Video Transitions → Drag to the middle of clips → Adjust Duration/Position”. Beginners should start practicing with these four transitions; a few tries will make you proficient. For example, use Cross Dissolve for smooth scene transitions in vlogs; use Dip to Black for emotional shifts to add more depth to the connection – simple and practical.
5. Advanced Tip: Use the PrAide Plugin to Quickly Add Transitions (Beginner Efficiency Booster)
Beyond Pr’s built-in Transition Effects, I highly recommend a plugin super suitable for beginners – PrAide. Using it to add Transitions is more efficient, and it can also solve Media and Captions problems along the way!
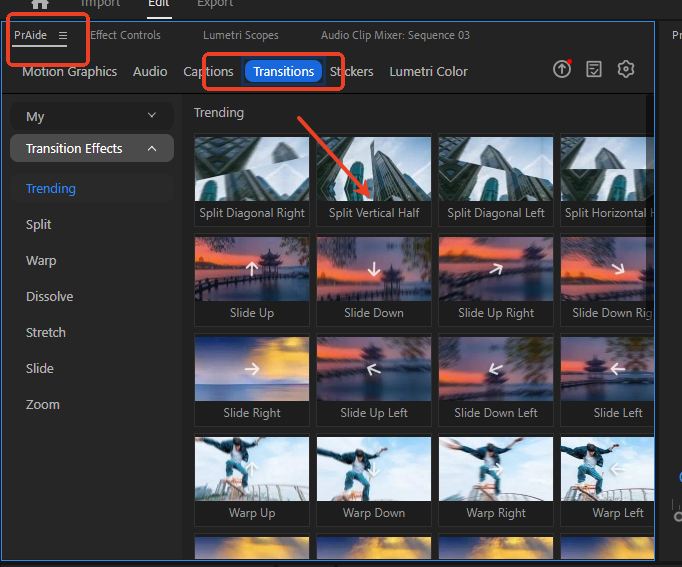
After installing PrAide, it will generate a dedicated Panel within the Pr interface. You can enable it by going to “Window” > “Extensions”. No more sifting through complex effects lists to find Transitions.
How PrAide Adds Transitions Open the PrAide Panel, find the “Transitions” category. It contains not only the basic Transitions we just learned (like Cross Dissolve, Dip to Black) but also many personalized dynamic Transitions (e.g., light/shadow Transitions, blur Transitions, split Transitions, etc.). Select the desired Transition Effect, directly click “Apply to Media“, choose the two clips on the Timeline that need connecting, and the plugin will automatically add the Transition between them. It even allows one-click adjustment of Transition duration (options like 1 sec / 0.5 sec / 2 sec), which is more convenient than manual dragging!
Other Practical Features of PrAide The biggest headaches for beginners making videos are finding Media and creating Captions. This plugin offers a one-stop solution:
- Media Library: Built-in massive free video Media, Audio, Stickers. No more searching everywhere for royalty-free assets; just drag and drop onto the Timeline to use.
- Captions Features: Supports one-click Caption generation (speech-to-text), Caption style modification (font, color, size), and adding Caption animations. Beginners don’t need to type Captions manually word by word, saving significant time.
- Quick Tools: Also includes features like video speed adjustment and Lumetri Color presets, basically covering all the needs for beginners making short videos.

For beginners, first use Pr’s built-in Transitions to grasp the basic logic, then use PrAide to improve efficiency. This way, you can build a solid foundation while saving time on video production – offering superelevation value for money!
PrAide Download:https://pr.aide.art/