Windows
 Apple Silicon


Table of Contents
In video editing, Transitions are the “bridges” that connect different visual segments. They not only prevent abrupt cuts but also enhance the narrative pace and convey emotional atmosphere through stylized design (e.g., using cross dissolves for a gentle mood, or fracture effects to highlight conflict). As professional editing software, Adobe Premiere Pro (Pr) offers various methods to implement Transitions, including basic operations and advanced techniques. This article systematically introduces Pr’s built-in methods for adding Transitions, explains why using Adjustment Layers is more recommended, and explores the application of third-party tools in improving Transitions production efficiency.
1.How to Add Pr’s Built-in Transitions
As a fundamental skill in Pr editing, Pr’s built-in basic Transitions can quickly satisfy simple scene-connecting needs, suitable for beginners to try.
- Preparation: Open Pr software, create a new project and import video Media. Drag the Media to a Timeline track, ensuring two clips are seamlessly connected (no gaps, otherwise Transitions cannot be added normally).
- Find Transition Assets: In the Pr interface, go to the top menu bar: Window > Workspace > Effects. In the opened Effects Panel, expand the “Video Transitions” folder, which contains categories like Dissolve, Slide, Push, Blur, etc. Common basic Transitions (like Cross Dissolve, Dip to Black, Wipe) are found here.
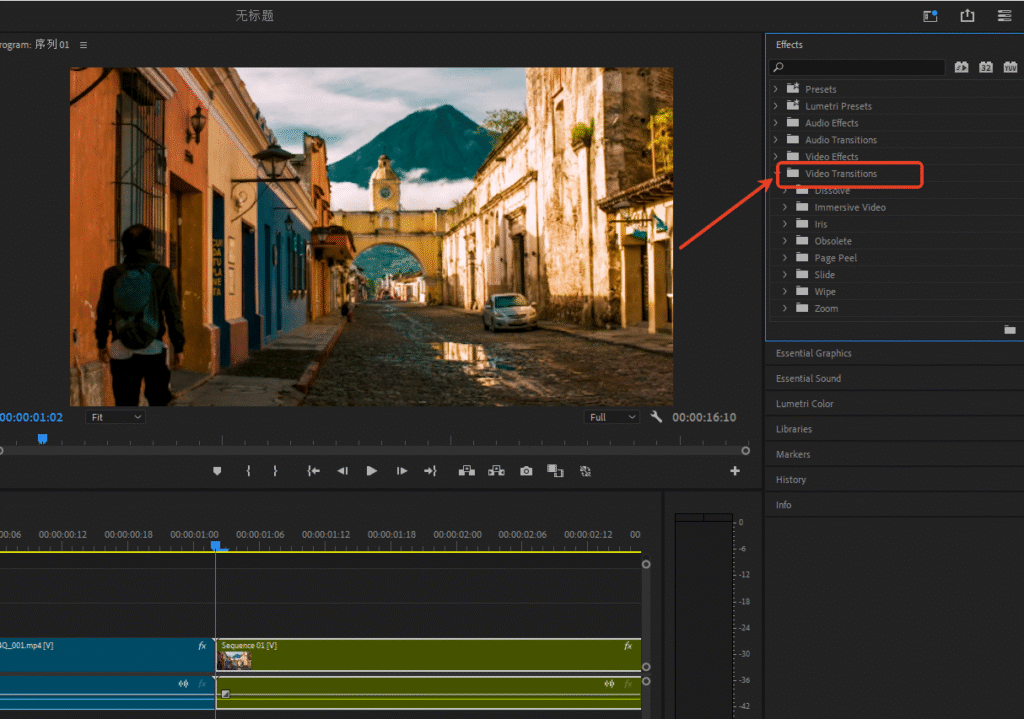
- Apply a Transition: Select the target Transition (e.g., “Cross Dissolve”) and drag it directly to the junction point between two video clips on the Timeline. Pr will automatically generate a default 1-second Transition Effect. Alternatively, right-click on the seam between clips and select “Apply Default Transition” to add it quickly.

Note: Pr’s built-in Transition Effects are limited (mostly basic styles). Moreover, Transitions applied directly to clips have significant drawbacks: modifying them requires deleting the original Transition and re-adding a new one, making parameter adjustment cumbersome. Creating complex Transitions (e.g., light leaks, fractures, dynamic splits) requires manually adding keyframes or downloading additional assets, which is not user-friendly for beginners and is less efficient.
2.Pr Adjustment Layer Transitions
Compared to adding Transitions directly onto clips, using Pr Adjustment Layers for Transitions is a more professional, flexible, and advanced implementation, commonly used by experienced editors. The core advantages are:
- Non-Destructive to Original Media, More Freedom for Modification: An Adjustment Layer is an “overlay” independent of the video Media. Transition Effects are implemented on the Adjustment Layer without altering the original clip’s visual data. To change the Transition style, simply replace the effect on the Adjustment Layer without touching the original Media, avoiding accidental damage.
- Strong Parameter Control, Greater Creative Space: Multiple effects (e.g., “Blur + Scale + Color Gradient”) can be stacked on an Adjustment Layer. By using keyframes to control the start and end states of these effects, you can create personalized Transitions not possible with Pr’s built-in ones (e.g., customizing light leak range or fracture animation rhythm).
- More Efficient for Batch Application: If multiple clips require a unified Transition style, you can copy an Adjustment Layer already set with the desired Transition and paste it onto other clip junctions, eliminating the need to repeat parameter settings, greatly improving batch editing efficiency.
- Adapts to Complex Scenarios: When video clips have effects like color grading or cropping, Adjustment Layer Transitions remain compatible, preventing conflicts and ensuring smooth visual transitions.
Basic Workflow: Create a new Adjustment Layer (File → New → Adjustment Layer). Drag the Adjustment Layer to the junction point between two video clips on the Timeline (covering the seam area). Select the Adjustment Layer, and in the “Effects” Panel, add effects like “Gaussian Blur,” “Radial Blur,” “Offset.” Use keyframes to set the effect to change from none to full, or from strong to weak, to complete a basic Adjustment Layer Transition.
Challenge: Manually creating Adjustment Layer Transitions requires mastering keyframe operations, posing a barrier for beginners. Complex Transitions (like dynamic fractures, 3D camera motion Transitions) involve tedious keyframe setup, consume significant time, and require a certain level of design skill to achieve professional results.
3.Recommended Pr Transition Plugin
To balance the advantages of Adjustment Layer Transitions with operational ease, we recommend the PrAide plugin. This smart tool seamlessly integrates AI features and a premium asset library into Pr. A core highlight is its superior use of the Adjustment Layer form when creating Pr Transition templates, preserving the flexibility and professionalism of Pr Adjustment Layer Transitions while completely solving the繁琐 problems of manual creation. It allows beginners to quickly produce professional-grade Pr Transitions.
- Core Advantages of PrAide Transitions: Exquisite Pr Adjustment Layer Transition Presets
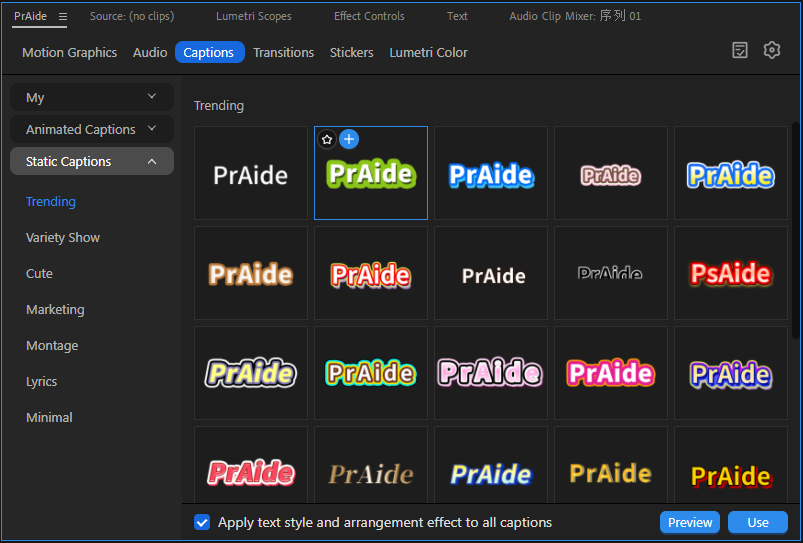
(1) Massive Professional Pr Transition Templates, Full Style Coverage: Select the “Transitions” category in the main PrAide interface to enter the dedicated Pr Transition template asset library. All templates are created using the Adjustment Layer form and include styles like camera motion, warp, stretch, split, fracture, dissolve, light leak, shake, and many more. Whether for short videos, vlogs, ads, or artistic music videos, you can find suitable Transition Effects without manually setting keyframes or designing Adjustment Layer effects.
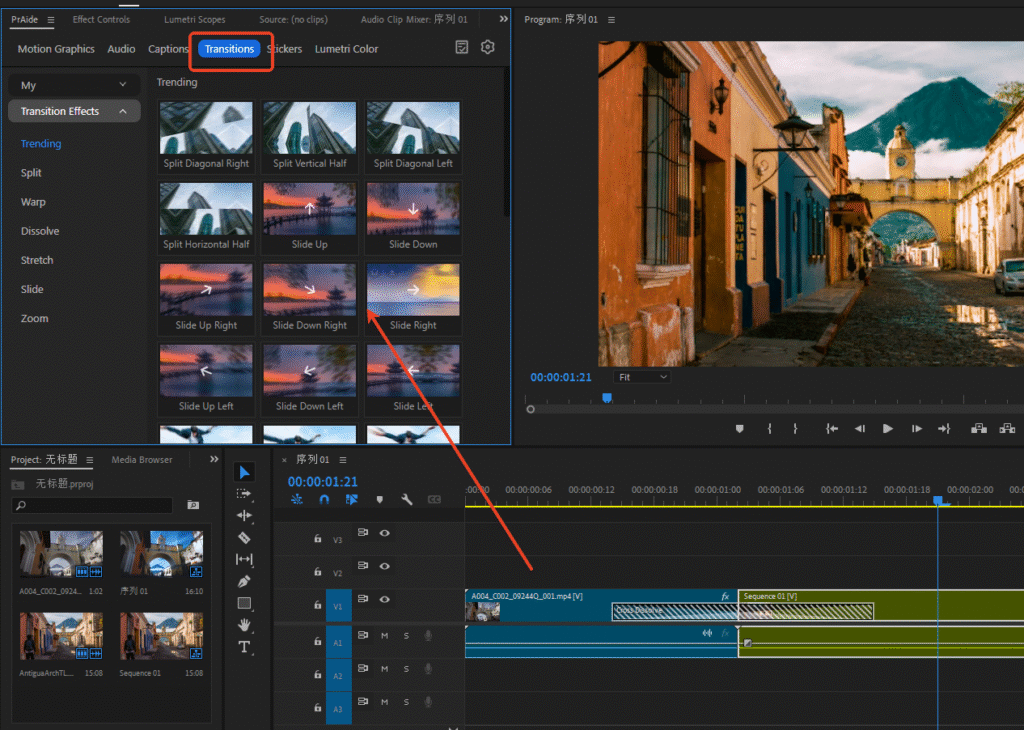
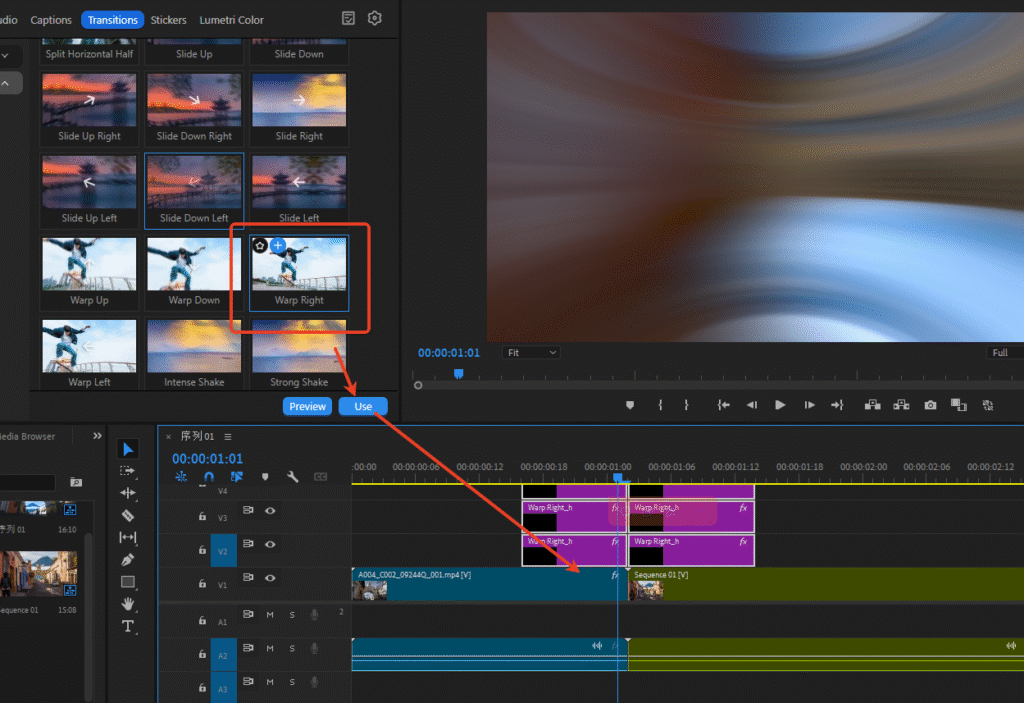
(2) One-Click Application & Free Switching, Zero Learning Curve: No need to master the complex operations of Adjustment Layers. Simply select the video clip(s) on the Pr Timeline, double-click a PrAide Transition template, and apply the Transition in 1 second (the plugin automatically generates a suitable Adjustment Layer and adds the effects). If unsatisfied with the result, switch directly to another template without redesigning the Adjustment Layer. Compared to the “hard-to-modify, time-consuming” issues of manual Adjustment Layer Transitions, this maximizes flexibility and efficiency.
(3) Flexible Custom Adjustments for Personalized Needs: Select the Transition Adjustment Layer generated by PrAide, and you can fine-tune parameters like duration, intensity, color, and animation rhythm in the “Pr Effect Controls” Panel. This retains the controllability of Adjustment Layer Transitions without the need for manual Pr keyframe setup, balancing efficiency and creativity.
- More Than Transitions: One-Stop Pr Editing Workflow Service
PrAide is not just a single Transition tool but a comprehensive plugin covering the entire Pr editing scene. It allows you to complete the full creative process within Pr without switching between multiple tools.
(1) Rich Editing Assets Beyond Pr Transition templates, it provides a vast library of Pr Motion Graphics templates, Stickers, Lumetri Color presets, Captions templates, background music, and Sound Effects. These can be dragged and dropped for quick application, enhancing video visual quality. Used alongside Transition Effects, they add more design sense to your edits.
(2) AI-Powered Pr Editing Workflow:
- Smart Captions Processing: Built-in AI Caption Recognition and Script Matching accurately transcribe video speech into Pr Captions with high precision, saving manual typing time. It offers various Pr Caption style and animation templates; apply with one click to animate your Captions, automatically syncing with the video’s rhythm.
- Personalized Voiceover Solutions: Supports multi-voice AI Voiceover with natural, expressive delivery. The Voice Cloning feature allows you to record a custom voice sample to generate personalized voiceovers, giving your video a distinctive sound and perfectly addressing both “Captions + voiceover” needs.
- AI-Generated Premium Assets: Supports AI-generated video Media. Input your requirements, and AI can create creative video Stickers.
In summary, if you only need simple Transitions, you can use Pr’s built-in functions. If you pursue professional results and have ample time, you can try manual Adjustment Layer Transitions. If you want to balance professional quality, efficient operation, and rich style variety, PrAide is the best choice. By optimizing the implementation of Adjustment Layer Transitions and combining it with AI-powered full-workflow editing assistance (Caption Recognition, AI Voiceover, Voice Cloning, smart Stickers, etc.), it makes Pr Transition production accessible without professional skills. Moreover, it makes the entire editing process more time-saving and effortless, allowing beginners to produce work comparable to that of experienced editors.
Whether you’re a beginner or an experienced creator, PrAide can help you escape the process of creating Pr Transitions while simultaneously solving multi-dimensional needs in editing. It frees up more time for creative thinking. Give it a try and make your Pr projects more polished and competitive!
PrAide Download:https://pr.aide.art/
Perhaps a simple attempt will bring unprecedented ease to your Pr editing. If you’re struggling with creating Pr Transition Effects, click to Install Now and try PrAide bravely—you might gain unexpected rewards.